
How to Adjust the Inking Rollers on a Vandercook SP-15
 Oh, hello again! Don’t mind me, I was just checking the roller height on this Vandercook SP-15. What’s that? You. . . you don’t know how to check the roller height? You’ve never adjusted the rollers? Holy Christ, you’d better sit down.
If you don’t know how to adjust your roller height, you don’t know how to print. I’m not trying to be horrible, I’m just telling it like it is. But don’t worry! Checking the roller height is easy and I shall show you how. I said SIT DOWN!
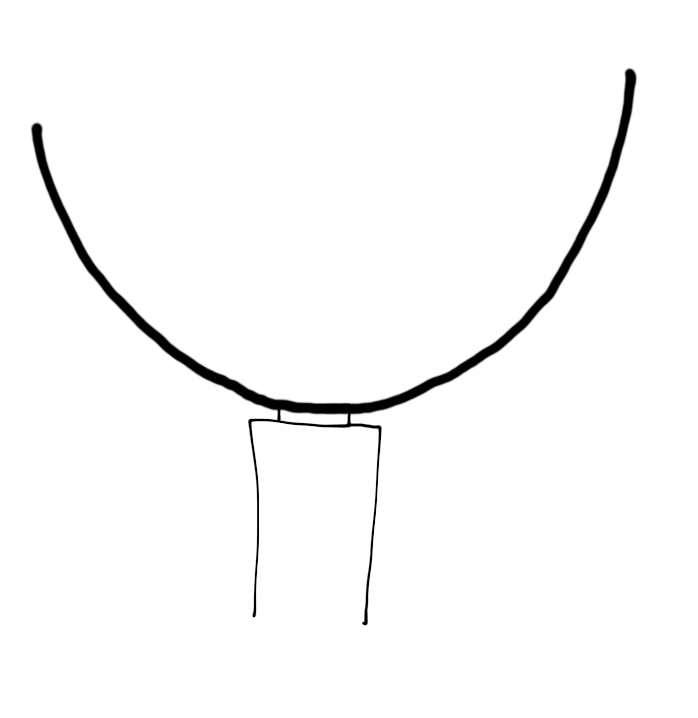
Different tasks require different heights. If you are printing 12 point type, your rollers should be high enough that they ink those dainty little letter forms like a princess is giving them a little kiss. If you are printing an enormous linoleum cut, you want your rollers so low so that the block gets slathered in ink. Below you can see a simply excellent drawing showing a roller of perfect height inking a piece of type:
In the well-rendered scenario above, the type is inked exactly where it should be, on the letterform and nowhere else. But if the rollers are too low, this is what happens:
 Shock horror! The ink is smooshing all over the place, not only on the letter form but also the surrounding area. On the printed sheet, this translates into terribly printed type. The letterforms will have rough, gummy edges and an inky halo. Look, I’ll show you:
 Disgusting. Do you see the halo? Do you see the smooshiness? When the rollers are the correct height (perhaps you’d like to zip up there and have another look at my immaculate illustration) the type should look crisp and beautiful. There should be no inky smooshy halo.
 You can see now that setting height of your inking rollers is a critical part of every press run, right? When you arrive at a press and ink it up, you have no idea where those rollers are. You don’t know who was using the press before you were or what they were printing. You don’t know if the rollers managed to raise or lower on their own while they were being cleaned. You don’t know anything at all. But there is an easy way to find out. Look around you. Somewhere nearby, there is one of these:
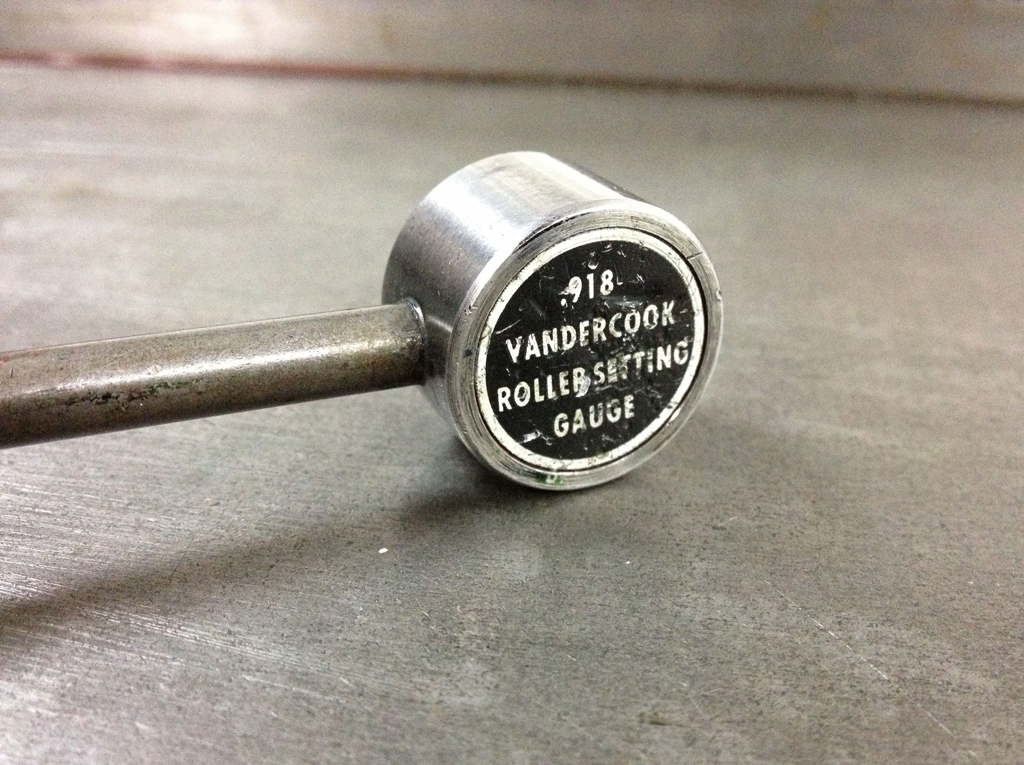
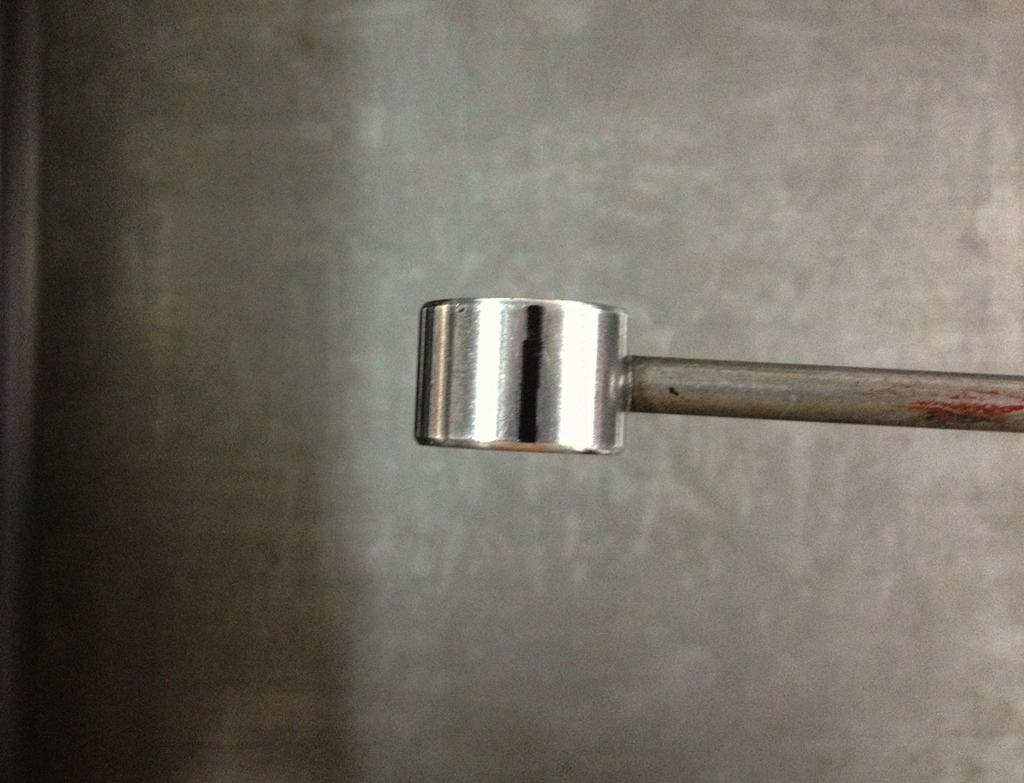
 This adorable little lolly pop is a roller height gauge. When it is set on its curve like a wheel, it is .918 inches tall, exactly type high. Here I have proved this for you by setting it next to an enormous “M.” (Some roller height gauges are .968″ high, European type high. Make sure you know what you are using.) You can test the roller height by rolling them over this little gauge and looking at the stripe of ink they leave behind. The wider the stripe, the lower the roller. Don’t worry, I will show you what I mean. (please see Paul Moxon’s comment at the bottom of this post. New gauges can be purchased from Boxcar Press and NA Graphics)
Why do you keep trying to leave? I am just trying to help you.
Each of the two rubber rollers should be checked in two positions, on either end a few inches away from the edge of the roller. Here is a helpful illustration:

You should check the height of the rollers after you have inked the press, but before you have locked your type into the bed. Make sure the rollers are down (and rolling) and bring the cylinder a few inches forward from its resting position so that it is sitting roughly where your type will be. Set your gauge on its curve in the bed of the press, about four inches from one side of the bed and away from the rollers. Forcefully push the gauge under the front roller, bring it back, and have a look. Like so:

 Some people like to crank the cylinder over the gauge rather than push the gauge under the roller, but I prefer pushing the gauge. This way I can actually feel the resistance as the gauge passes under the rubber. As you check the rollers more and more frequently, you will get a sense for how the rollers should feel against the gauge. But we’re not there yet, so let’s have a look.
 Whoa, dog. That is one wide stripe. This looks to be about an eight of an inch (or about three mm) thick. This might be right for printing a huge area of color like a lino block, but if we are getting ready to print some dainty little type, we need to raise this side of this roller or your text will look like hell and printers will talk about you behind your back. Steve Miller at the University of Alabama always told us to look for the “width of a nickel.” For my UK friends, look for the width of a 2p coin, or roughly two mm. Before we make any changes, though, lets check the other three positions. First this front roller on the other side, and then the back roller. To check this roller on the other side, simply wipe the gauge off on your apron and repeat what you’ve already done. To check the back roller, turn the gauge on its side:
 Slide it under the first roller. This way our reading won’t be confused.
 Now when the gauge is between the two rollers, flip it up so that it is sitting back on its curve:
 Jab the gauge back and forth just as you did before, turn it on its side again, and bring the gauge back under the first roller and have a look.
 That’s more like it! If we are printing 12 point type, the reading above is about right. Continue until you’ve checked all four positions. Keep track of how wide these stripes are in relation to each other. If you don’t get a stripe at all, the roller is so high that it is not making contact with the gauge.So now let’s aim to get all of these rollers into the right place.
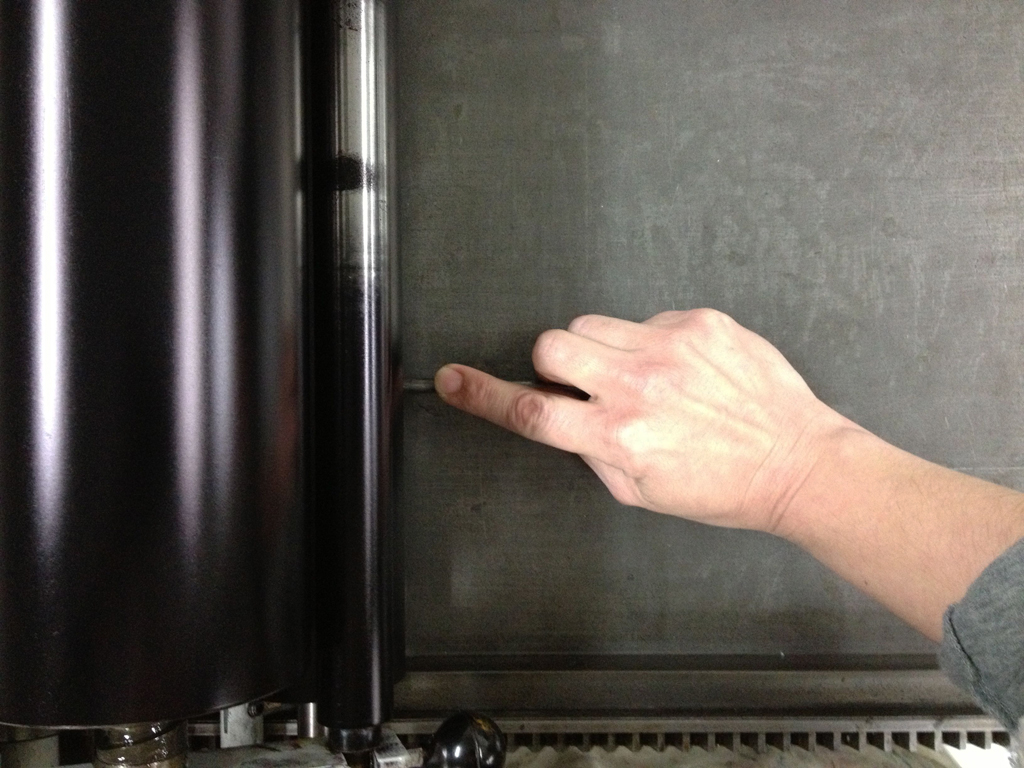
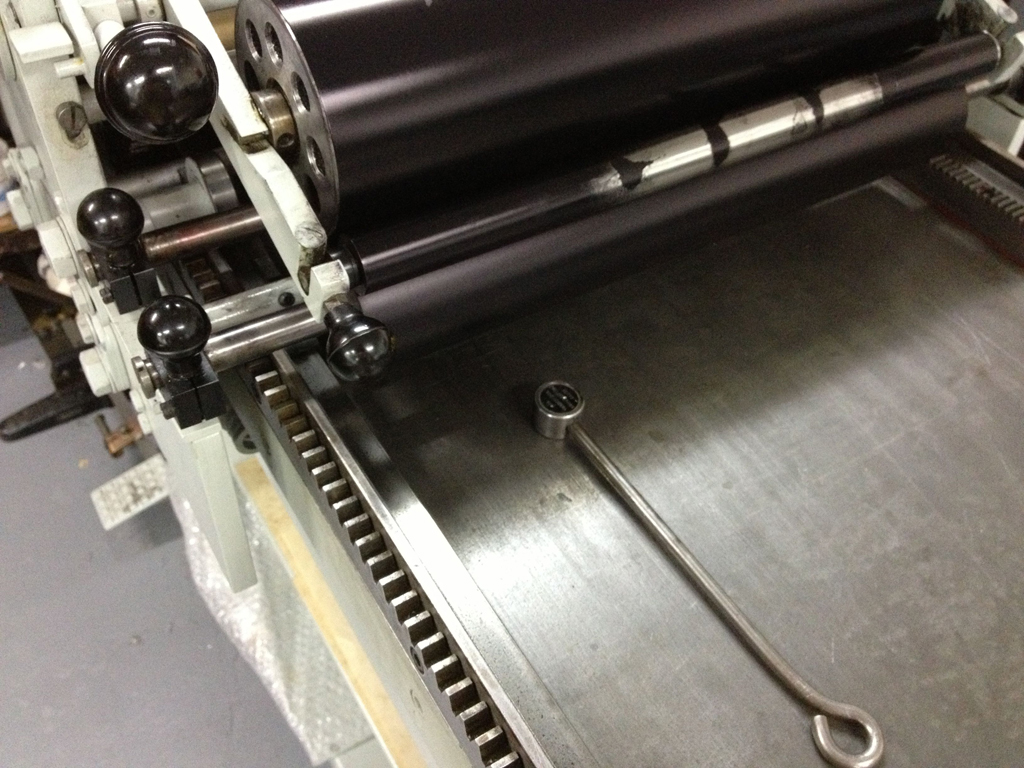
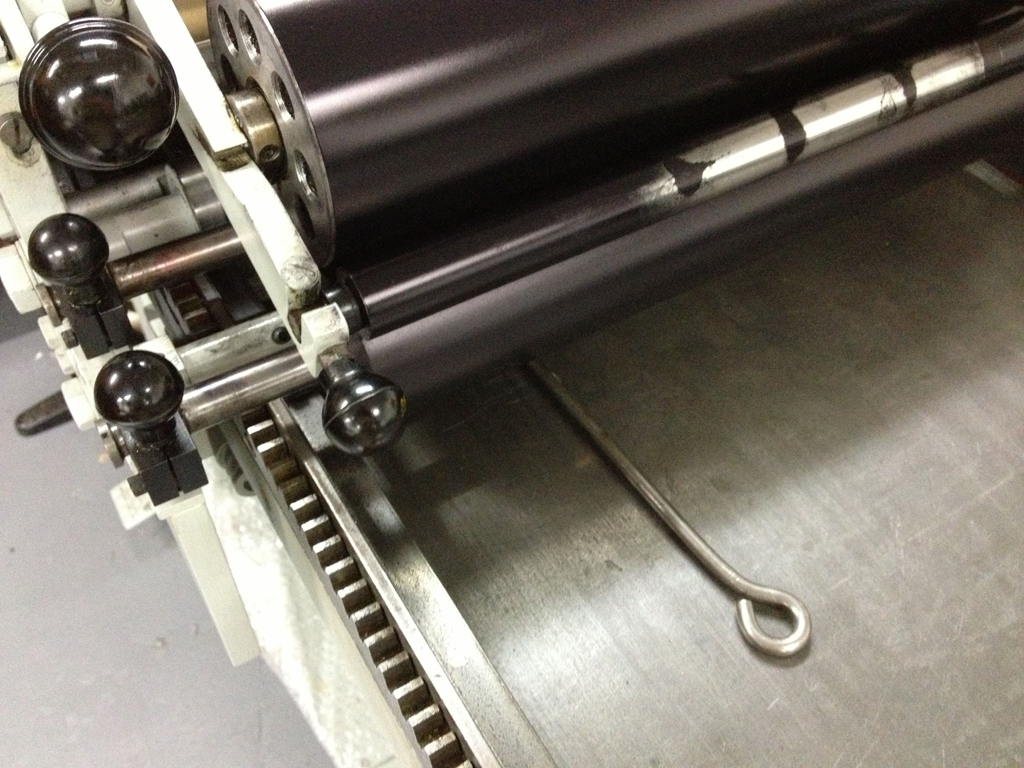
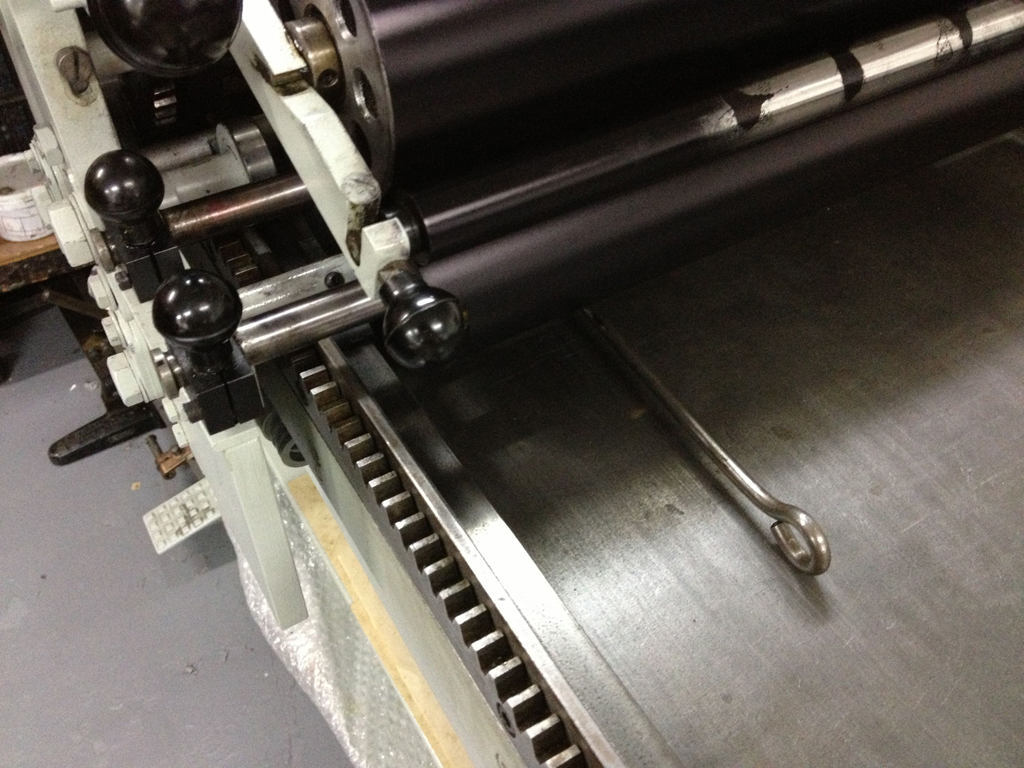
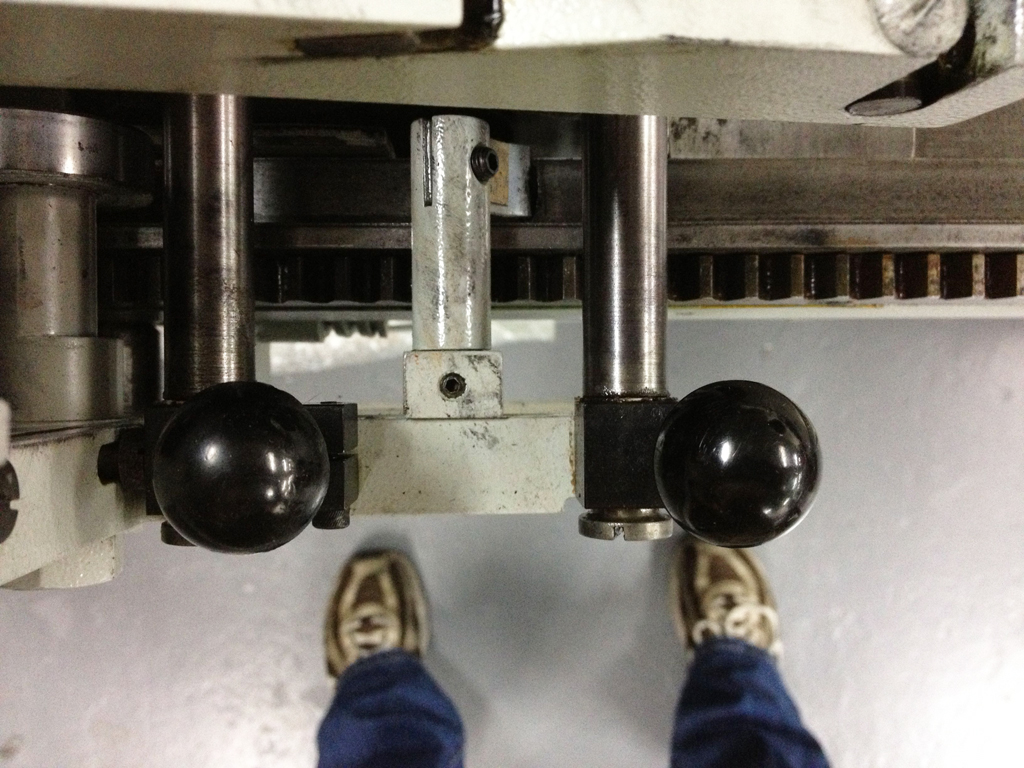
 Turn this press off and lift the rollers (by lifting the larger of those yummy bakelite knobs.)
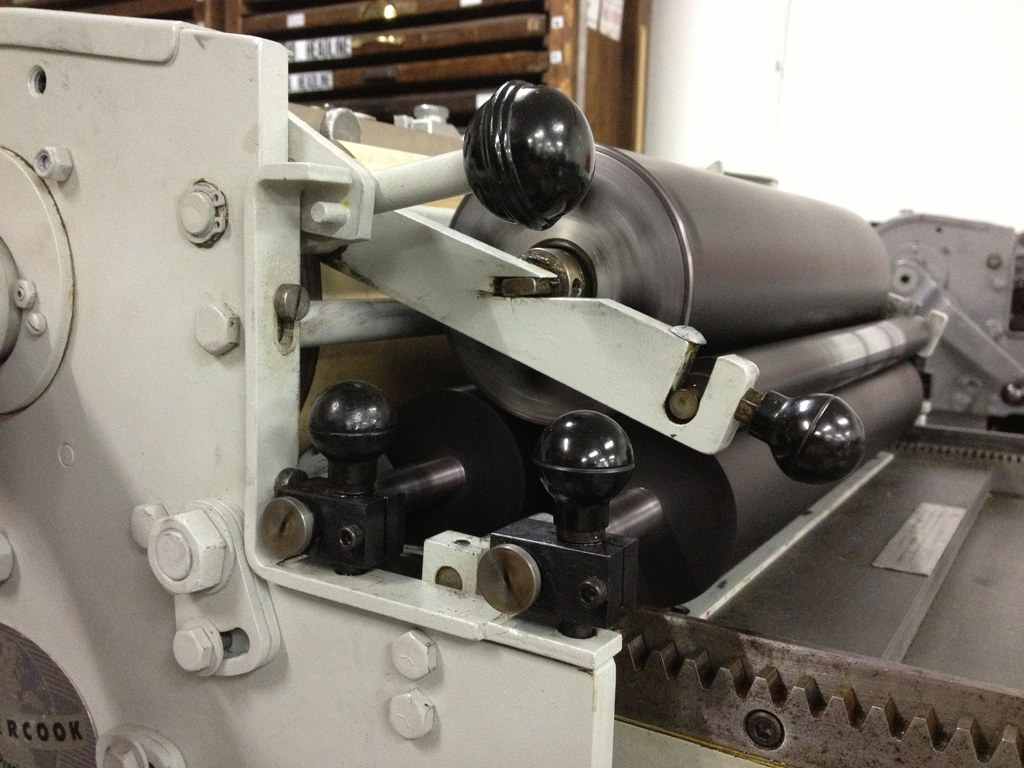
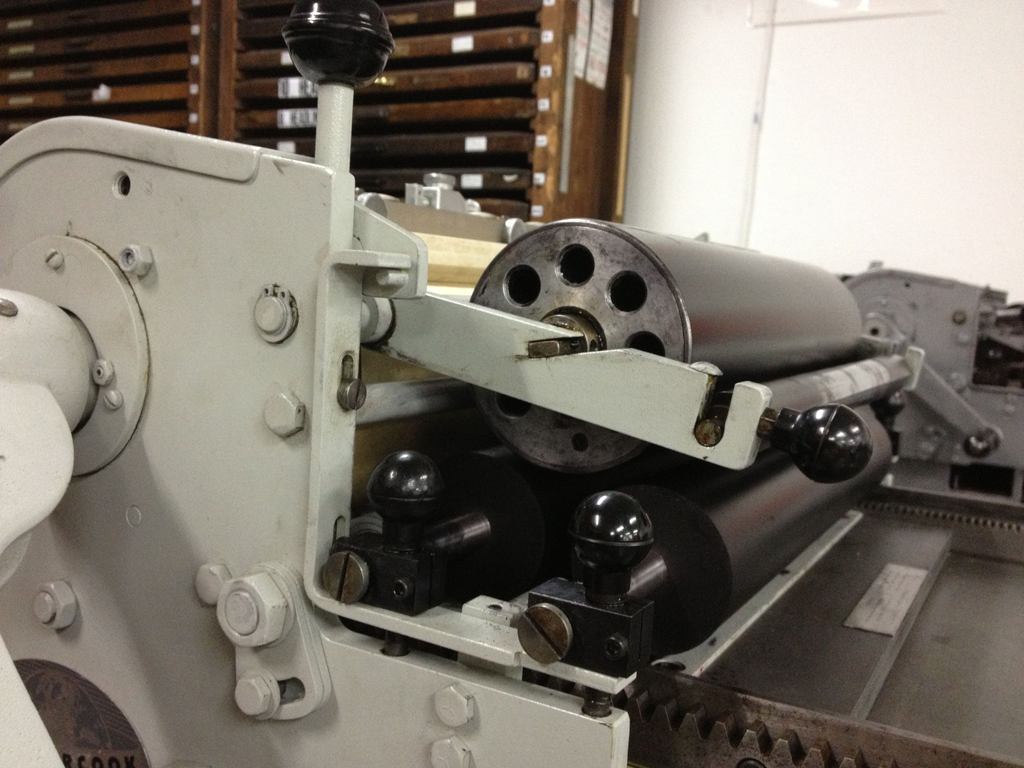 Great. On a Vandercook SP-15 (and many other Vandercook models, including the SP-20 and the Universals) The rollers are adjusted by turning the small knobs on either end. BUT WAIT. First we must unlock them. These little knobs should be difficult to turn at first. This is because they are pinned in place by a little set screw that can be released using an allen (or hex) key.
 Some presses have a slightly different assembly here and instead require a tiny wrench (or spanner.) Whatever it is, it should be close at hand. Loosen the screw using the old “righty tighty, lefty loosey” mantra.
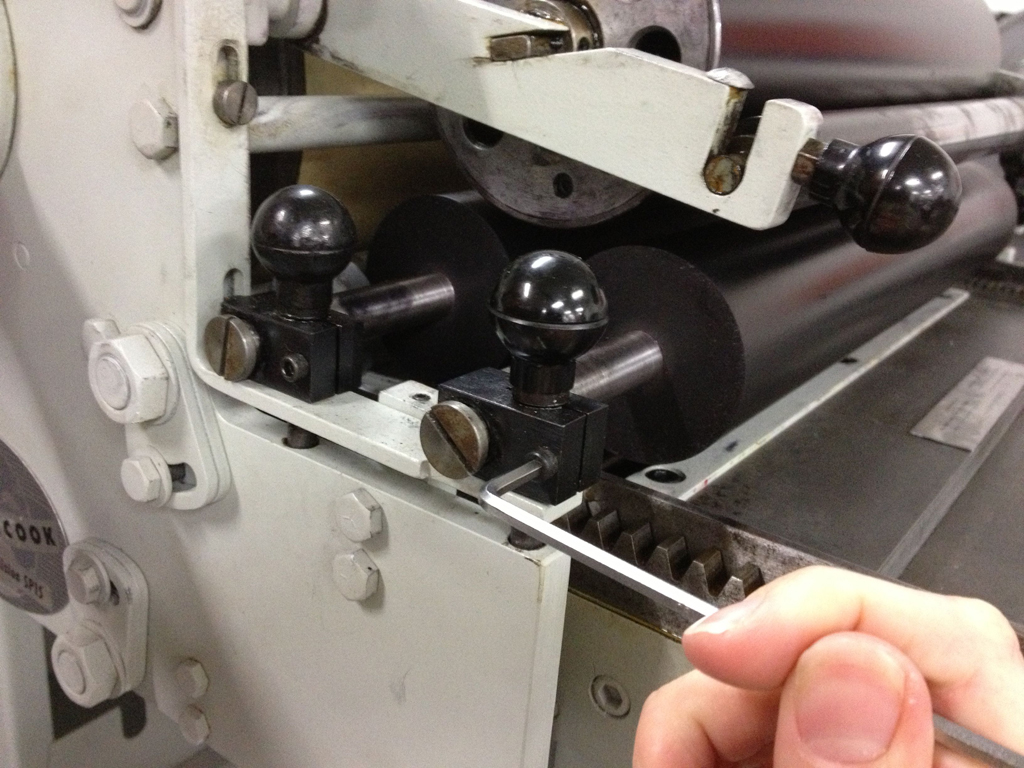 NOW and only now should you fiddle with those knobs. THERE WILL WELL UP INSIDE OF YOU A GREAT TEMPATION to turn the knobs without loosening the screw. DO NOT GIVE IN!!! It is the devil speaking to you, hoping to use you as a press defiling instrument. If you listen to the devil and persist in turning the knobs without loosening the screw, you will gradually strip the threads on the knobs and they will lose all of their purpose. The rollers will move up and down of their own volition in the middle of your press runs, and you will have to reset them TEN TIMES AS OFTEN. And you will thusly and rightly be punished by your own laziness.
 Loosen all of the screws and reflect on which rollers need to go up, which need to go down. When you are ready, it is time to turn the knobs. Here is a new mantra for you: Right to Raise, Left to Lower. Learn it well. A little goes a long way here. Remember that wide stripe from my first reading? I want it to raise the roller so that the stripe will be half that width. I will begin by only turning the knob about an eighth of a turn to the right.
 Make similar adjustments to the other rollers as needed using similar restraint. When you are finished, tighten the lock screws back up before testing again. I didn’t used to tighten these before I tested, and many people don’t bother. But I have observed that on some of the presses I’ve used, the act of tightening those screws actually lifts the rollers slightly. If you don’t tighten before you take a reading with the roller height gauge, you will not be accurately measuring where the rollers will sit when you are printing.
When you’ve got all of the rollers where they should be, you are ready to lock up your type and get going. Checking and adjusting the roller height should be simply a part of your routine. Different presses have slightly different roller assemblies, but the essentials remain the same.Right to Raise, Left to Lower, Right to Raise, Left to Lower, Right to Raise, Left to Lower, Right to Raise, Left to Lower, Right to Raise, Left to Lower, Right to Raise, Left to Lower, Right to Raise, Left to Lower, Right to Raise, Left to Lower, Right to Raise, Left to Lower, Right to Raise, Left to Lower, Right to Raise, Left to Lower, Right to Raise, Left to Lower, Right to Raise, Left to Lower, Right to Raise, Left to Lower, Right to Raise, Left to Lower, Right to Raise, Left to Lower.
Ok. Now you may go.
UPDATEA message from Paul Moxon, press maintenance specialist and the man behind the Vanderblog: “ tell ‘em that lollipops, er, roller setting gauges, do wear down and then can no longer provide accurate readings. This is especially important when printing from polymer plates. Replace it if there is a visible flat spot. Boxcar and NA Graphics sell new ones. Don’t buy used, unless it has a cool vintage brass label and then put it in your museum display.”
10 comments on “How to Adjust the Inking Rollers on a Vandercook SP-15”
Leave a comment


oh, lord, that’s why i only visit printers and they let me play. surely there are other things that are even harder to learn! sigh. that little tabletop kelsey in the studio, the one with the melted rollers (yes, they melted off after the old ones were replaced), can’t possibly be so complex. right? right??
Ha! Well, it may not be as complex, but it’s also not as much fun! JOIN USSSS, VELLMAAAA.
Jessica Peterson and I once encountered a stripped-out roller-height adjusting knob hole on a Vandercook. We adequately solved the problem by wrapping the screw in a bit of ultra-thin white plastic plumber’s tape.
Yes! Me too! I think I learned that trick from Paul Moxon. Or was it you? Or Steve? Wherever it was, it was a life saver.
Great post, SB! No more mucking around. And tell ’em that lollipops, er, roller setting gauges, do wear down and then can no longer provide accurate readings. This is especially important when printing from polymer plates. Replace it if there is a visible flat spot. Boxcar and NA Graphics sell new ones. Don’t buy used, unless it has a cool vintage brass label and then put it in your museum display.
You got it, Paul! I was about to plug your book but I see it’s sold out! Any plans to reprint? Thanks for suggesting me as a juror for that show by the way!
Thanks. Not a reprint, but a second edition, with expanded text and more images, later this year. You’re welcome about the show. What it needed was star power.
Here’s the url for the benefit of all: http://letterpressephemera.com/
oh, yes, thanks. I’ll put something more serious about that soon. Can’t wait to see the new edition!
Okay. What the world needs more of is instruction delivered with flavor. Your post was very tasty. As a newbie with an SP20, I am scouring resources for intel and am grateful to have stumbled on this knowledge-stream in hopes of making much of my investment. I love it when the light goes on and I understand something more fully. Nicely done there.